Status API
The Snap Status API has been created to allow retailers to directly get the status of an application. We recommend to call this on the server side to get the application status. Retailers can then update their orders based on the code response.
If you aren't familiar with the SDK, please read the Javascript SDK documentation first.
API Details
🧪 Sandbox Environment: This environment should be used during the integration phase. This environment is a safe space to test your integration without affecting real production data. The base URL for the sandbox environment is:
⚠️ Production Environment: Once your integration has been tested and is ready for production, you should update your API requests to point to the production environment. All API requests will interact with live data. The base URL for the production environment is:
Headers: Ensure that this header is included in every API request. Failure to include a valid authorization token will result in unauthorized access and the request being denied by the server.
Response: You will receive a "progressStatus" field. This field indicates the current state or stage of the operation being performed. An example response might look like this:
Further Explanation
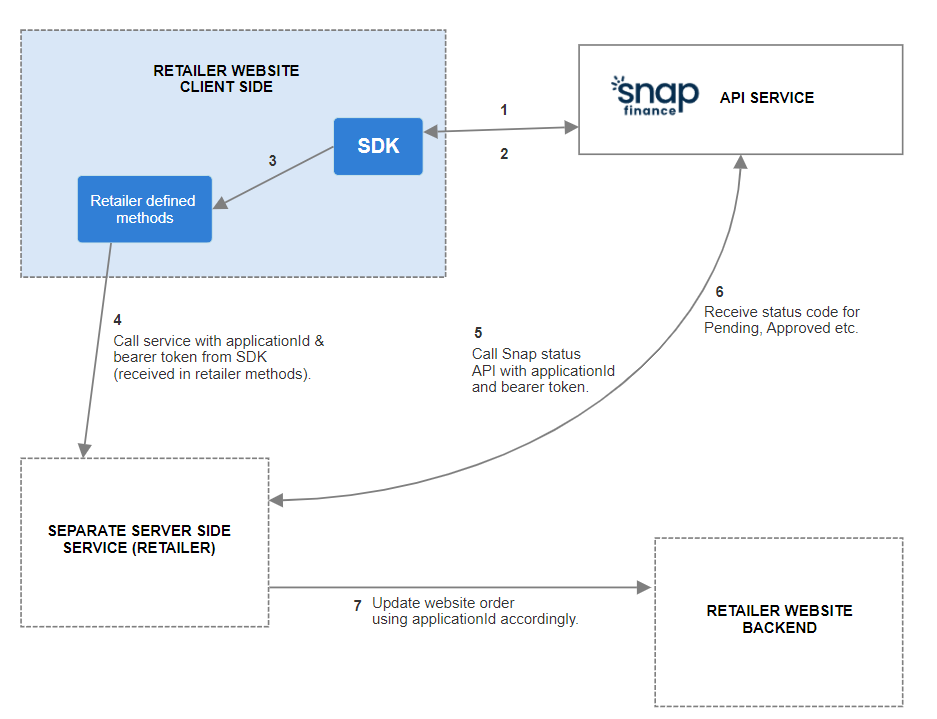
Once the Checkout has loaded, the user will start to make their way through the journey. At certain points in this journey, the SDK will call the retailer methods which the retailer defines when invoking the snapuk.checkout.button method. When these methods are triggered, we pass you the applicationId and a bearer token. Using these values the retailer can call our Status API to get a status code and based on that status code they can update the order on their side, using the applicationId as reference. We recommend Retailers make the Status API call and update the order on the server side.
How to Implement?
This depends on the how the Retailer application has been created. If you have access and the ability to create a server side service then this can be done in your existing application. If not, then you may be required to create another small server side service.
This service must call the Status API, which will return a status code. Based on the response code, you can update your order accordingly. Please see the diagram and status codes below.
Codes and states
The status code returned for each application will be one of the following. You can see what each code means below:
progressStatus: 2= PENDINGprogressStatus: 6= APPROVEDprogressStatus: 10= APPROVED_WITH_CONDITIONSprogressStatus: 14= DENIEDprogressStatus: 18= WITHDRAWNprogressStatus: 22= PENDING_DOCSprogressStatus: 26= PENDING_DEL (This is the expected status for the 'onSuccess' method)progressStatus: 30= COMPLETEprogressStatus: -1= ERRORprogressStatus: 0= FUNDED
Implementation
Step 1: Create a new service
applicationId and token to in Node.js.token and the applicationId must be received in the request. These are the only 2 parameters to be used.https://app.snapfinance.co.ukStep 2: Integrate the service with the checkout button
token and the applicationId that are provided into the API request.https://example.co.uk.